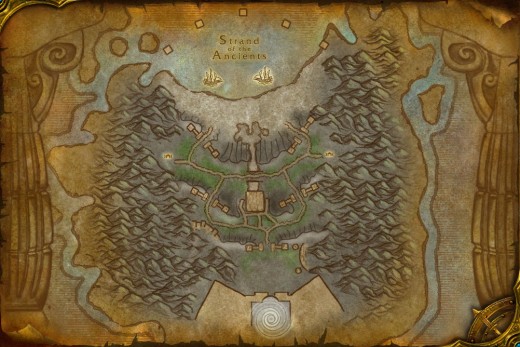
Strand of the Ancients Tactics
I say tactics, as if it's complicated. There are basically two... kill gates with siege equipment, kill the siege.Let's start off with the basics first. The game is split into two halves, with your team either having to defend the Strand of the Ancients relic or capture it. The team capturing the relic in the fastest time wins. The defending team should split into two balanced groups (how do you split 15 into two equal halves is a good question? And the answer is don't be so pedantic 😛😛), with healers in both. Then you head to where you see the ships on the map.
Your main aim is to kill the siege and not to be drawn into a melee with the enemy. They will however be intent on drawing you into one. Resist and pursue the siege until it is destroyed. Throw everything you have at the siege and don't be concerned about dying. The Honor Point reward for the win is paramount, rather than the damage you do to individuals.
The aim of the attacking team is to attack the gates barring the way to the relic. Have a look at the map to see the location of the gates. Siege riders should be very blinkered about their purpose. It is to get to the gates and destroy them as quickly as possible. Normally aboard your ships there is a debate about the first gate to attack. There is a preference to concentrate on just one, either Green or Blue. The reasoning being that the concentrated firepower will take out the first gate without you losing all the siege, something you must avoid at all costs.
When you are through carry on to the next gate and the next until you get to where the relic is housed and break through until you capture it. Of course, you will have done incredibly well to have got all the way from the ship to the relic without being destroyed. It should not happen.
Team mates of the siege driver should be keeping the enemy off the siege by using slows and all means possible. That is the priority, it is not a priority to kill, although an enemy solely concentrating on killing siege should not be too hard to kill.
Once through the first gates, the attackers should capture the graves. The locations are, again, shown on the map. The defenders, if they have anything about them, should have a Rogue or Druid hidden to prevent the capture. Meaning that it takes more than one person to capture. These are the only graveyards that should be captured because your team will resurrect next to the new siege workshops that become available. If more are captured, you will end up well away from the siege.
As well as siege, bombs are available from the workshops. Everyone, even siege riders, should equip one and use it on the gates. However, protecting the siege remains the priority. Take those gates down and get to the relic as fast as you can.
Back to the defenders... there are two cannons at each gate. Do not use them at the first set of gates, instead congregate by the ship in whatever group you were assigned to. It is fine to use the cannons at later gates, but it really is pointless at the first one because you want to damage those Demolishers asap.
If you lose a gate, move to defend the next gate on that side of the map. The idea is to attack the siege that is nearest to the relic destination as that is likely to be where the attack will be the most concentrated. Use your in game map to locate the enemy.
OK that is basically it... it is very straightforward, but you will be amazed at how many people forget the basics in this battleground.
#Strand of the Ancients #battleground

No comments:
Post a Comment